All Yarn, All the Time

Friday, September 22, 2006

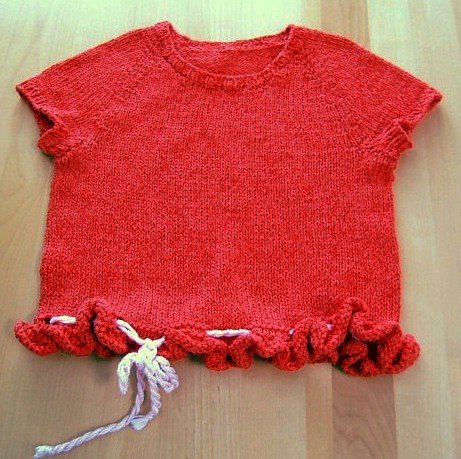
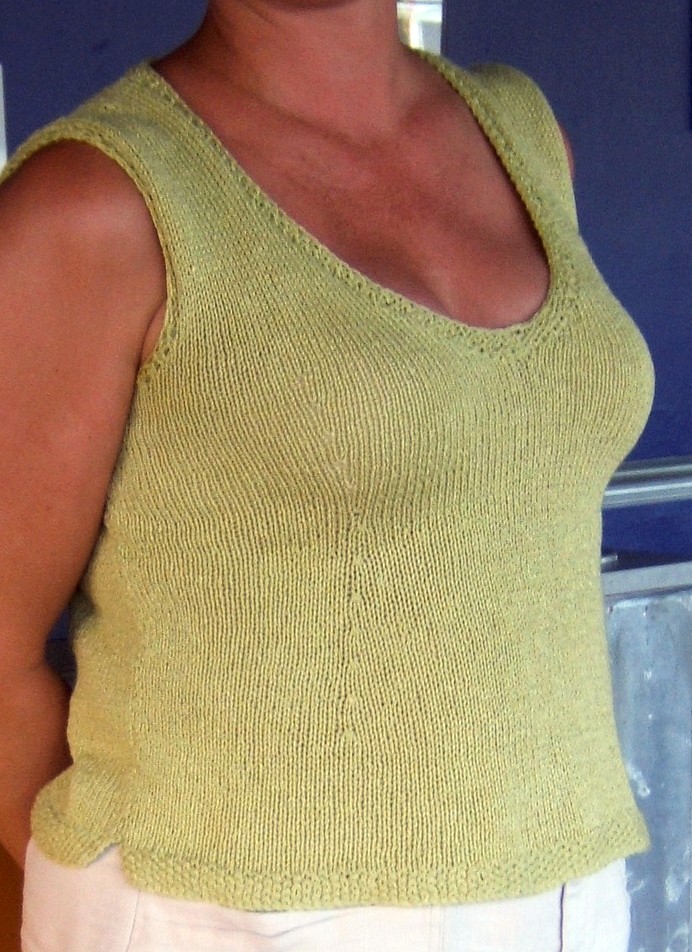
Raglan Ruffle Sweater Pattern

Thanks for all your lovely comments on my work, I really appreciate it. So for your amusement, I present the Raglan Ruffle sweater. Kay (aka Sock Princess) knit this one a year or so ago, and I think Vicki made one too. I'm sure I never updated the pattern with your comments, so if you see any problems please let me know so I can correct them - I did my best to make this as clear and error free as possible. Elise got a lot of wear out of it, and the Cotton Twist was machine washed many times with excellent result.


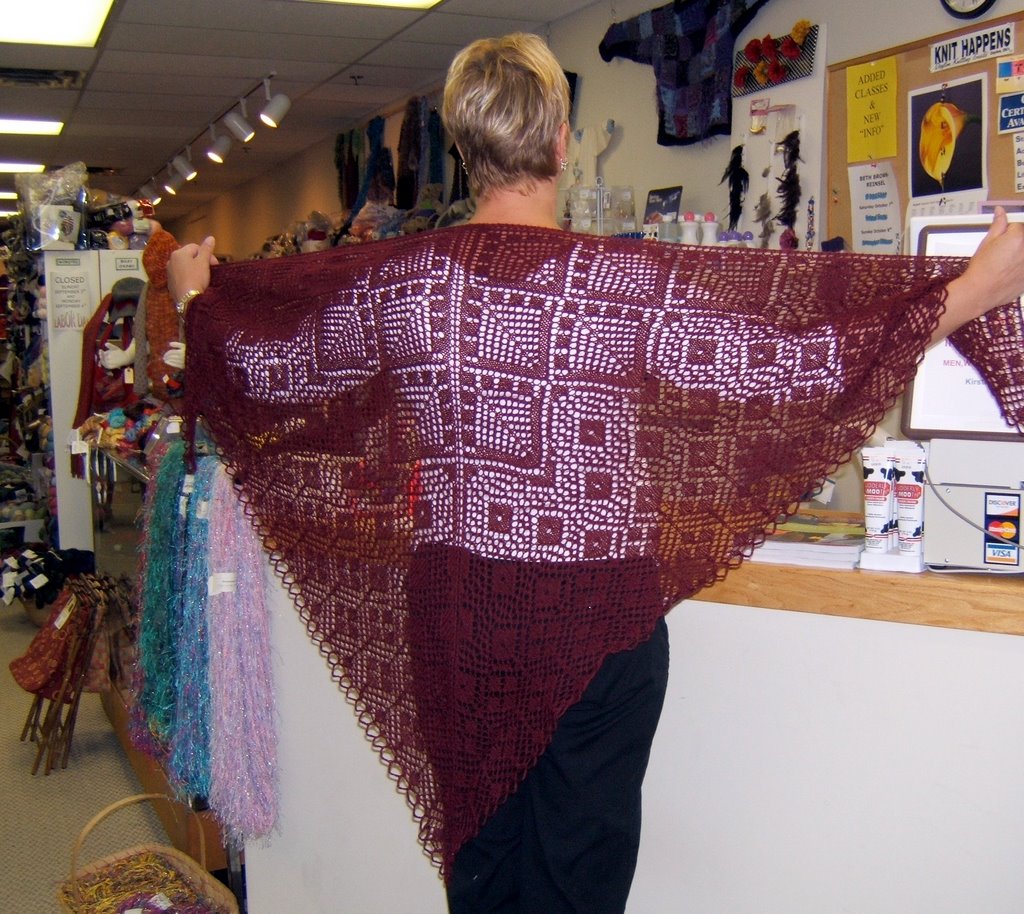
Notes: This short sleeved child sweater is knit from the top down in one piece, with an eyelet trim below natural waist and ruffle finish on the bottom. The eyelet band is threaded with contrast yarn made of twisted cord. The sweater is worked in plain stockinette stitch. Ruffle bottom is not represented in the schema measurements. Shown in size 25 inch chest on almost-4-year-old.

Needles: US 8, 6 or to make gauge

Size: 27 inch chest , about 4-5 year old size

Gauge: 5 sts 6 rws per 1" Stockinette stitch

Estimated Ydg: 470

Yarn: 6 hanks of Berroco Cotton Twist, 85 yds/hank, 70% Cotton 30% Rayon

Start

With larger needle, cast on 44 sts. Do not join.

Set Up Row

RS: Knit 1, pm, K1 (seam st), pm, work 8 sts (sleeve sts), pm, work 1 st

(seam st), pm, work 22 sts (back sts), pm, work 1 st (seam st), pm, work 8

sts (sleeve sts), pm, work 1 st (seam st), pm, work last st.

Turn, work one WS row (purl).

Neck Shaping

Working back and forth in stockinette, inc 8 sts on each RS row as follows: *Work to

marker, M1, sm, k1(seam st), sm, M1; repeat from *. Cont in this manner until

2 sts before the first marker. [2, 10, 24, 10, 2, + 4 seam sts] (52 total sts)

Working back and forth, inc 10 sts on each RS row as follows: Inc 1 in the

first st. *Work to the marker, M1,sm, k1(seam st), sm, M1; repeat from *,

end inc 1 in last st.

Cont in this manner until there are 12 sts before first marker. [12, 20, 34, 20,

12, + 4 seam sts] (102 total sts) On the next RS row, increase before and

after each seam stitch (8 increases). Complete row, cast on 10 sts. Join and

cont working to the first marker, round start. Round sequence: sleeve, back,

sleeve, front. Sts: [22, 36, 22, 36, + 4 seam sts] (120 total sts)

Bodice Shaping

To complete the bodice:

M1 on either side of each seam st (8 incs) every 1 rnd/rnds 1x, then every

2 rnd/rnds 11x. Sts: [46, 60, 46, 60, + 4 seam sts.]

Work even until 48 rounds [8"] are

complete.

Slip sts for each section onto separate pieces of scrap yarn. Sequence:

sleeve sts, back sts + 2 seam sts,sleeve sts,front sts + 2 seam

sts.Sts: 46, 62, 46, 62

Work Sleeves

Sleeves (work 2)

With larger size needle cast on 5 sts, work 46 sleeve sts, cast on 5 sts, place

marker and join.

Shape Sleeve

work 1 rnd. Begin sleeve shaping:Dec 1 st on each side of marker every

2nd rnd 8x.Cont in pat st until piece measures 2"[rnd

12].

Change to smaller needles for cuff.

Sleeve-to-Rib Dec Round

[Work 12, k2tog] 2x, work 12.

Work rib for 6 rounds[1"].

Bind off 38 sts.

Work Body

Slip front and back body sts onto a circular needle. Cast on 5 sts, work

across front, cast on 5 sts, pm(side seam), cast on 5 sts, join front and

back, work across back, cast on 5 sts, pm(beg of rnd marker), Join.

Work in rounds until underarm to bottom measures 9" or as long as you need to hit just below the natural waistline, or as desired.

Begin eyelet band and finishing ruffle:

beginning at the side seam,

round 1: purl

round 2: k1, *yo, k2tog, k5. repeat from * to end (may not work out exactly, but should be OK…fudge at the end if you must to make it look mostly even)

round 3: knit

round 4: purl

round 5: knit

round 6: k1, m1 across. You will have 244 stitches now.

round 7: m1, k2 across. You should have about 325 stitches.

round 8 and 9: knit

Bind off all stitches and admire your ruffle!!

Finishing

Graft underarms.

Weave in all ends.

Standard Neck Finishing:

With smaller needle, pick up 72 sts around

neck edge. Inc or dec as necessary on

the first row to balance pattern. Work

rib for 1" or desired length. Bind off

loosely.

Twisted cord (directions adapted from All Stitched Up by Jane Crowfoot, an excellent book on finishing techniques):

With contrast yarn, choose 3 strands of yarn that are twice as long as needed to thread through eyelets and tie a bow...you will have to estimate.

Tie strands together at one end and and tape the knot to the wall with masking tape. Twist the yarn in one direction until it is tight.

Next, hold the end of the yarn firmly in your left hand and pinch the middle of the yarn with the thumb and forefinger of your right hand. Take the end in your left hand up to the secured end and let go of the piece held down by your right hand.

The yarn will twist itself into a cord. Tie the free ends together and even out any bumps using your fingers.

Wednesday, September 20, 2006

Rejected, but Not Dejected :o)

Remember back at the beginning of summer when I was submitting stuff to Debbie Stoller for her next SnB book? Well, I finally got my rejection letter. Very personalized, too, addressed to Dear MY LAST NAME IN ALL CAPS. Whatever. Anyway, here are some of the glamour shots of Emily in her Cucumber Cool top that I submitted, and if you are interested in the pattern I will get it together for you. Yes, Vicki, I know I was supposed to that before, but I'm busy! ;o)

The yarn is just that coned cotton stuff that I dyed myself, about 200 yards for this project. It's a simple lace body with seed stitch top and straps. Very cute, I think.


This other is really just an over-grown swatch that I made into a halter top. I'm not at all surprised this wasn't chosen, but I still think it's pretty cool. Made out of TLC Cotton Plus, which was actually pretty nice to work with. Modeled here by the Elise.


I'm finishing up the collar on the yoke sweater for Em, and got the yarn to complete Roger's other glove so I'll be working on those things. Then back to the drawing board, I guess!! Thanks for looking!

Monday, September 18, 2006

Shoalwater Completed and more

Here is the blocked out Shoalwater Shawl I finished last Tuesday, posing on the bay window for dramatic effect. I love the way it turned out and despite an (obvious to me) mistake, I love it.

Yarn: Henry's Attic Kona Superwash Fingering weight, dyed by me with Procion MX aquamarine and pale aqua.
Pattern: Shoalwater Shawl by Evelyn A. Clark, from Fibertrends
Needles: US size 7 bamboo circs
Modifications: none. I had thought I might not do the i-cord finish on the top of the shawl as it seemed a little superfluous on top of the 3-stitch garter edge, but decided to do it because the waviness of the Old Shale pattern needed a firmer finish. Of course I should know that Ms. Clark would know what she's doing!! I loved the picot edge, and I love the way it turned out with my dye job. The yarn is very soft as well with a lovely drape.


Here are a couple of pictures of WIP's (works in progress):
Sweater for Emily, out of Elann.com Peruvian Highland Chunky 100% wool from stash (not currently available, I bought this in January 05). I purchased it with the intention of making her this sweater from Patons, but decided I wasn't thrilled with the pattern and am making this my own with ideas from The Best of Lopi from the library. Now that I'm into it, I think they all look very similar and I could have saved myself some Math from just doing the original pattern. Another learning experience, eh?

This is the first (unblocked) of the gloves I'm making for Roger. Note the smoke tire tread pattern that matches his tattoo? He actually made the chart for this, and is very happy with this first one. I had to order more yarn because I used more than half of the ball of the brown-grey heather and didn't want to mess with the dye lots not matching. I don't care if the whole glove doesn't match the first exactly but I don't want the fingers on the same glove not to match. Not much of a perfectionist, am I?

Sunday, September 10, 2006

It's soccer season!

Yes, Fall is upon us and with school comes soccer season. For the next 8 weeks we cannot go anywhere or make any plans to do anything on Saturdays because the girls are busy being fabulous on the field. The first games were yesterday, and they both won. Well, at Elise's level (her team is the Pink Flamingoes) everyone wins, but Emily's team (the Tigers) really did win 3 to 2, and she almost scored on a rebound but kicked it over the top of the goal. She is looking really tough this year. I tried to get a picture of them, but they really weren't in the mood.


However, the sun is shining, so I took a quick picture for color purposes of the Shoalwater Shawl I've been working on this week. I'm in the home stretch and should finish it today, I hope. It just takes a long time to a row when you have 400 stitches on the needle. I love the magic of lace: it looks like a shapeless lump of wool, and then blocks out to a thing of beauty. Will post pictures when it's done!

Tuesday, September 05, 2006

And another summer project done!

Ever since Wendy posted her Sizzle top, I waited anxiously for her to publish the pattern. I bought it as soon as it came out in July, found a suitable yarn in my stash, and whipped it up in about 5 days (she says it's about a 3 day project - well maybe in her size!). So without further ado:


Pattern: Sizzle by Wendy Bernard
Yarn: Berroco Linet (discontinued) from stash
Needles: don't remember, maybe US size 4?
Modifications and Notes: I made the shaping darts with the increases and decreases on the inside of the markers as opposed to the method indicated in the pattern because I started it before her pattern revision came out telling me to do it outside the markers. Basically the same result. I loved working with the Linet, it has excellent drape and a lovely sheen, so of course it's discontinued. Next time (because I'm sure I'll make this again) I think I will make it a little longer in the shaping section before I start the neck and arm decreases.

I loved the simplicity of the pattern, because you know lately I like to knit anything that is tricky just for the sake of keeping my interest, hence the lace and now the colorwork. But simple garments often look best when worn, and I've received many compliments on this top. I also appreciated that Wendy had the pattern instructions in "real" sizes, from 30" all the way to 54" chest measurements. More designers should include a better range of sizes. Check out her blog - she has some other really nice designs, plus she's a hoot to read.

Thanks for looking! Those of you who know me know why I chose this top this summer!

Sunday, September 03, 2006

Socks, Socks, Socks, and Sock. Oh, and some freshly dyed yarn.

Today I have lots to show and tell to catch up from not posting all summer.

First: the completed Broadripple socks with the geisha toe.


Yarn: Regia cotton tip & top color
Pattern: non-stretchy Broadripple sock from Threadbear Fiber Arts
Needles: US size 0
Modifications: Split the big toe, just for fun. I was pleased to be able to figure it out, and the socks actually fit very well.

Second: Pink Ribbon Socks for my mom for her birthday (as modeled by Emily):


Yarn: Dalegarn Baby Ull in a lovely soft pink color
Pattern: Pink Ribbon Socks
Needles: don't remember, maybe US size 2
Notes: I didn't make any modifications except only used 2 ribbon repeats, but I have to thank my friend Vicki for gifting me the yarn and pattern for my birthday in July so I could actually have a good idea for my mom's August birthday! Mom is a 17 year breast cancer survivor, yea mom! Sorry about the poor picture quality.

Third: Emily's loud wool knee socks


Yarn: Paton's Classic Wool Merino from stash in black, hot pink, green, and blue
Pattern: Tradition Socks from Sock Hop book (scroll down)
Needles: US size 3 bamboo
Modifications: None, really. These were my first "real" fairisle project, and now I'm just as addicted to colorwork as I am to lace. They were really fun to knit and I quickly figured out how to do the 2-handed knitting which is easier to do than it looks. For the socks, I made them with the same colors, only on the second sock I switched the blue and pink for that mismatched look. Emily loves the color scheme and is very happy that I've finally made her socks - I had refused before because her little feet are growing so darned fast!


Finally: One generic toe-up sock

Yarn: Brown Sheep Wildfoote in bright green and Lana Grossa Weilenweit Multiringel (not the cotton kind) in color 5122
Pattern: Wendy's toe up sock pattern
Needles: US size 0
Modifications: none I guess since the pattern is very generic. For the short row toe, heel, and cuff I used the solid green, and for the rest of the foot and leg I alternated the solid with the self-striping yarn. I think it's a really cool effect. This was my first toe up short row sock, and I have to say I didn't enjoy the method so much, but the sock fits well and I guess I'll make one to match. I may try another toe up method instead of the short rows, we'll see.


And now, for the home dye I did yesterday with about a half pound of fingering weight Kona from Catnip yarns:


We still don't have sunshine and wish I could get a better picture of the color, it turned out so soft and beautiful. I show it here with the intended pattern, the shoalwater shawl from Fiber Trends. And now, since I've finished the shawl club shawl and Elise is napping, I'm going to ball it and begin. :o)

Friday, September 01, 2006

Diamonds are a Girl's Best Friend Shawl

Here is my latest finished item, the Diamonds are a Girl's Best Friend Shawl from Goddess Knits.


Pattern: Diamonds are a Girl's Best Friend July 2006 Bo Peep Shawl Club pattern
Yarn: Jaggerspun Maine Line in Claret, a nice fingering weight wool
Needles: Addi Turbo US size 5
Modifications and notes: Because this is a club, we have an associated discussion group. Several of the group members, including a good friend of mine had much trouble with the diamond edging, even with the corrected chart. Some of them also ran out of yarn before completing the border(scary!!). To avoid any unnecessary hassles (too busy/not interested in working out the issues), I just put a loopy crochet border on it, which I think turned out great. I do not think I would have run out of yarn, but eh, I wouldn't have wanted to have had to do it over if I did run out. Otherwise, I did find a couple errors in the pattern as did other club members, so I'm hoping that the next shawl kit which is due in October will not have any of these little problems. :o) Oh, and for sizing reference, I am 5'9" tall.

I love the color of this yarn, and it was very nice to work with. You can see from the pictures below that it blocked like a dream. We have had much rain and clouds the last few days, so I can't get a picture to show how rich and deep the color is, but maybe another time. I wore the shawl this morning to my LYS, and was very pleased and flattered by all the compliments I received. I think it really is a beautiful pattern.